Migrating your product catalog easily with Store Commander
You are planning on changing your PrestaShop version to a more recent one, and of course, you need to integrate your current products catalog onto the new site as simply as possible?
With Store Commander's CSV export and import tools, you will be able to pull out your products catalog onto a CSV file that you will use to integrate your categories, products and all other properties onto your new PrestaShop store using the import tool by following the below instructions step by step.
Lets start by exporting the data onto a CSV file.
A. EXPORTING YOUR DATA
Working on the shop where you will be exporting the products catalog, there are 2 options to modify first under Tools > Settings:
- Export root category: will export the complete category paths so that they can be recreated by CSV import on the new store - for PrestaShop versions 1.4.x only.
- Display all languages: includes active languages only

We can now open the CSV Export window from Catalog menu.
In the CSV Export window, create the export script.

![]() Loading fields
Loading fields
In the mapping panel, click on the 'load fields for import' icon ![]() - open the panel a little wider if necessary.
- open the panel a little wider if necessary.
This option will load only the database fields requires when importing in a case of a products catalog migration from one shop to another.
![]() Filtering languages
Filtering languages
If you are using multiple languages, only some database fields are available to import (refer to this article). All other fields can therefore be excluded from the mapping.
In this tutorial, we will only export English data. If multiple languages are displayed in the mapping, we need to filter the language column to then remove them from the mapping:
Let's say French is included, enter FR in ther filtering box of the 'Language' column to display all corresponding fields.
Then click on the mass-selection icon on the toolbar ![]() , and finally on the 'delete lines' icon
, and finally on the 'delete lines' icon ![]() - as per screenshot below.
- as per screenshot below.
Repeat the steps for any other languages until you only have EN.
![]() Renaming database fields
Renaming database fields
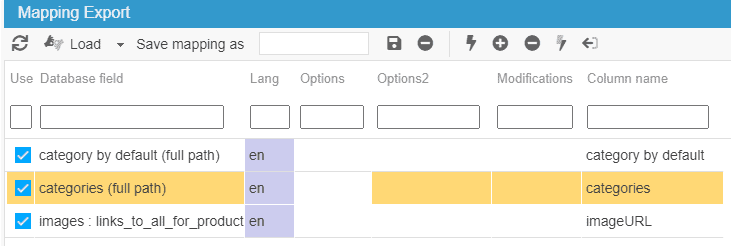
In order to configure the import mapping the easiest way possible, we need to rename the 3 fields below in the mapping, entering the new name in the column called 'Column name'.
- category by default (full path): category by default
- categories (full path): categories
- images : links_to_all_for_product: imageURL

![]() Saving the mapping
Saving the mapping
The mapping is now ready and can be named and saved.

![]() Selecting categories
Selecting categories
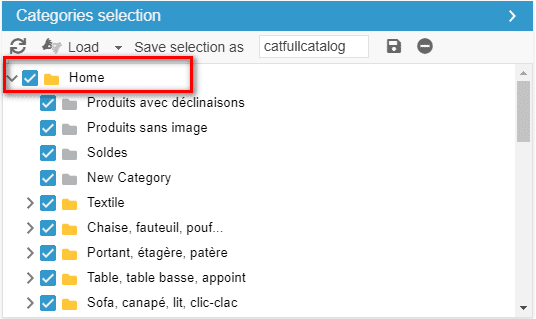
From the Categories panel, on the right handside, tick 'Home'. By default all categories included in Home will be selected automatically.
Name and save this configuration.

6. Selecting your options
Back in the top panel, select the name of the mapping, the name of the category configuration. Then enter the name of the CSV file and tick the other options as per screenshot below:

7. Exporting data
We are now ready to export by clicking on the corresponding icon in the Export Process panel:

Please note that the size of the data to export is rather large, then it is recommended to use the auto-export option ![]() .
.
Once the export has completed, click on the download link to save the file.

B. IMPORTING YOUR DATA
We now have the products information on a CSV file that we can integrate to the store using Store Commander's CSV import tool.
However, there are some notes to take into account before importing the file:
- Attachments: files should already be present in Store Commander's interface > Properties > Attachments. The import process will associate the attachments to the products but cannot add the attachments.
- EAN13: make sure the format of that column is set to 'number - no decimal'
- Location (when advanced stocks management is enable): warehouses should be present and using the same name. The import process will associate warehouses to products but cannot create warehouses.
- Quantity (when advanced stocks management is enable): warehouses should be present and using the same name. The import process will associate warehouses to products but cannot create warehouses
- id_shop_default (in multistore mode): make sure the default shop ID is the same on both shops (otherwise change the ID in the CSV file before importing)
- id_shop_list (in multistore mode): make sure the shop IDs are the same on both shops (otherwise change the IDs in the CSV file before importing)
![]() Loading the file
Loading the file
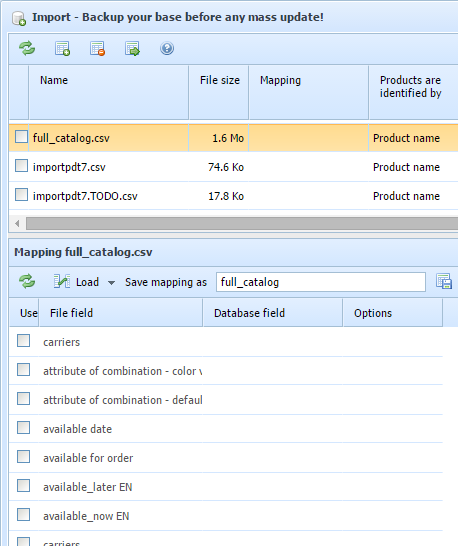
Once the CSV file is ready, load it in the import window and select it (on an orange background).
Instantly, the columns titles are displayed in the mapping panel.
![]() Configuring the mapping
Configuring the mapping
In the mapping panel, there is no need for you to match the file fields, but simply click on the 'load fields by their name' icon .
The database fields are then automatically matched.
Name and save the mapping.

![]() Selecting options
Selecting options
Back in the top panel, select the options as per screenshot below:

* Create categories (auto): your category tree will be created automatically during the import process and products will be associated.
* Create elements (auto): features groups and values, combinations groups and attributes, manufacturers, suppliers and tags will be created and associated automatically.
![]() Importing data
Importing data
In the 'Process' panel, change the number of lines so that it is higher than the number of lines in your CSV file.
We are now ready to import by clicking on the corresponding icon on the toolbar.

Please note that if your CSV file is of a rather large size (over 2MB), and/or you are on a shared server, it is recommended to use the auto-import option ![]() .
.
Once the import has completed, you can refresh Store Commander's interface to see all your categories, products and properties included in the import.
Related articles
