Managing tags with Store Commander
You can manage tags with Store Commander from the Tags panel in the Properties column, right handside.
You can also use the CSV import tool to integrate in bulk multiple tags to multiple products if need be.
Tag Management using Store Commander's interface
- Adding tags
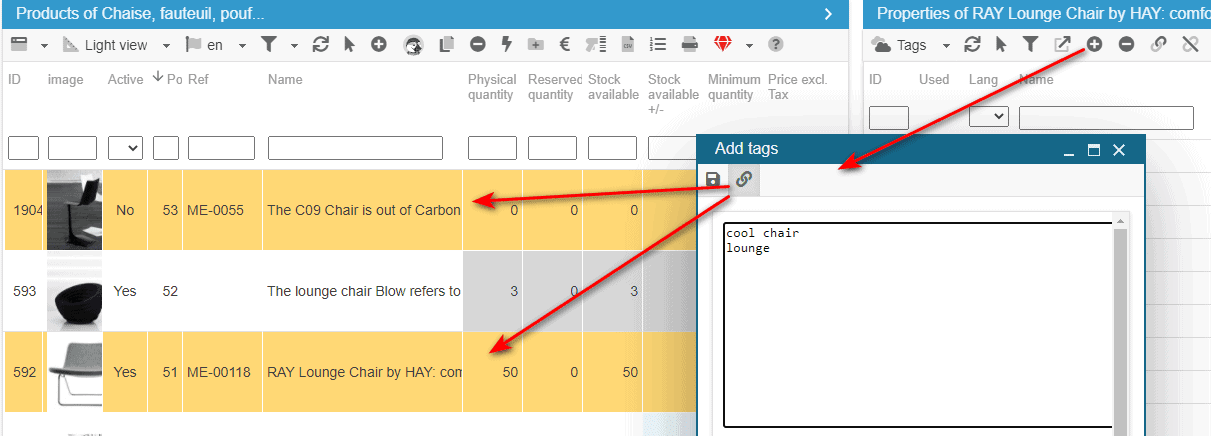
To add tags, click on the icon  on the toolbar which will open up a new window to enter the tag names, following the example shown at the bottom. As you can see, you can also add tags in various languages at the same time.
Moreover, in this window, you can see the icon  enabled by default (on an orange background) meaning that all new tags you are going to add will also be associated to the product(s) you would have previously selected, feeding two birds with one seed :)
You can then select multiple products before creating these new tags as they will be associated to all these products at the very same time, all in just one step!
- Editing tags
You can edit tag names by simply double clicking the cell to modify them.
The filtering tool also allows you to display tags in a specific language for instance, or simply look for tags by filtering by name.
- Deleting tags
On the contrary, you can use the icon  on the toolbar to delete any tags off your store, once you have selected them in the list.
- Associating tags
To associate existing tags to one or more products, you can either tick the corresponding boxes, or use the mass-association icon  on the toolbar once tags are selected in the list.
- Dissociating tags
To dissociate tags off one or more products, untick the corresponding boxes or use the mass-dissociation icon  on the toolbar once tags are selected in the list.
- Displaying products associated to a specific tag
Another useful option located on the toolbar as icon  allows you to identify products associated to a selected tag. Simply select a tag in the list, and hit the icon to display the list of associated products.
Tag Management using Store Commander's CSV Import
- Creating & Associating Tags
The tags name will be included in your CSV file, separated by a comma (comma being the default value separator) and will be associated to the product specified on the same line.
In the below example, all tags will be created if they do not exist, and will be associated to 'Armchair' at the same time.

For new tags to be detected and created automatically, you need to tick the option called 'Create elements (auto)' located in the main panel.
You can therefore create and associate tags in a single import!
- Dissociating Tags
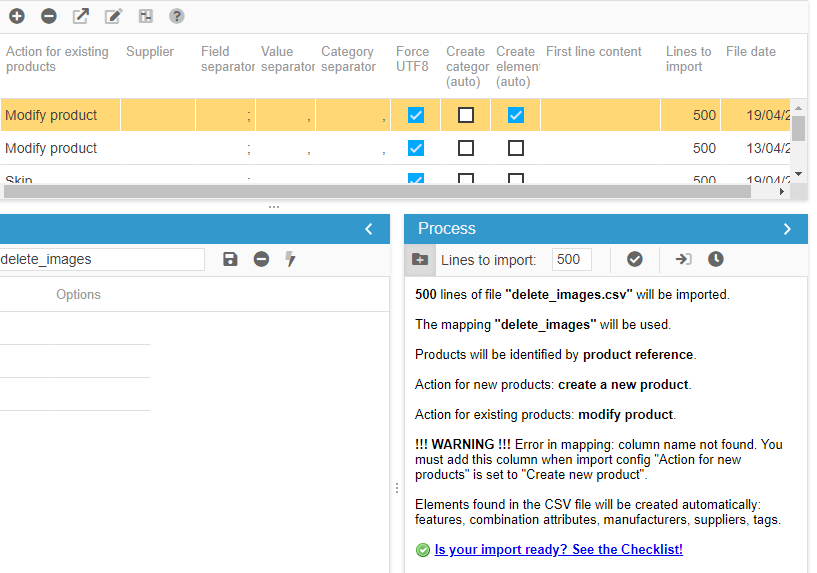
A mapping option called 'Action: Delete tags' allows you to dissociate all tags from a specific products, to eventually associate new ones.
The CSV file will include this 'delete tags' column at the very beginning of your file (this will be the first action of the import process), with value 1 (for yes), and eventually a 'Tags' column for tag names to be created/associated to the product.

The corresponding mapping will be:
